TOTPRadius - TOTP Self-service enrollment methods
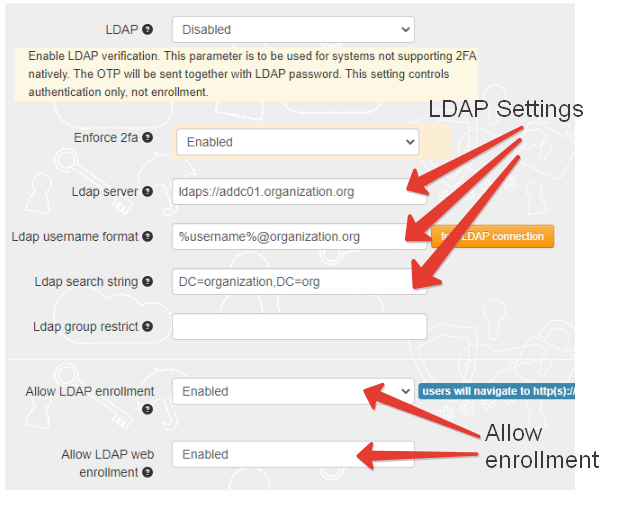
If you have many users, manually configuring the second factor may be quite cumbersome. TOTPRadius allows setting up two different self-service enrollment methods using LDAP authentication for the initial setup.As both of the methods described below require LDAP to identify the user, the requirement for this is a correctly set LDAP configuration. You can specify your LDAP or LDAPS server (or servers) by navigating to Admin Panel, then selecting LDAP Settings.

Please note that the first parameter (LDAP) only controls the LDAP proxy mode of TOTPRadius and not the LDAP enrollment portals. LDAP enrollment portals are controlled by "Allow LDAP enrollment" and "Allow LDAP web enrollment" settings as described further in this guide.
LDAP Enrollment (legacy)
This option enables the legacy LDAP self-service enrollment portal accessible inside your LAN (it is hosted on the same web interface as the TOTPRadius web admin page). While it is fully active, it is missing the new features that is available with the new internet facing self-service portal (explained in the next section). The legacy LDAP portal by default will redirect to the new portal ("/vpn/ldap/" - controlled by "Ldap web url redirect" parameter). The only use case for keeping the legacy portal accessible is when you want to allow TOTP app re-enrollment: this is not possible on the internet-facing LDAP portal.
LDAP web enrollment
The new portal allows enrollment from external (public internet facing) Web VPN portal. Only initial enrollment will be allowed, changing TOTP secret is possible using internal LDAP enrollment page or from the admin portal.

The enrollment process is described below:
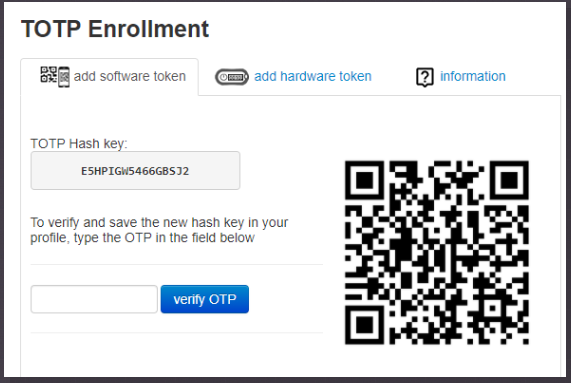
Enrolling software tokens
- Install a TOTP mobile app on your smartphone. You can use any TOTP compliant mobile authenticator, such as Google Authenticator , Microsoft Authenticator, Token2 TOTP+, FreeOTP and others
- Scan the QR code shown on the enrollment page with the TOTP mobile app. Then enter the OTP code generated by the app in the verification field. Click on 'verify OTP' button to complete the process
Enrolling hardware tokens
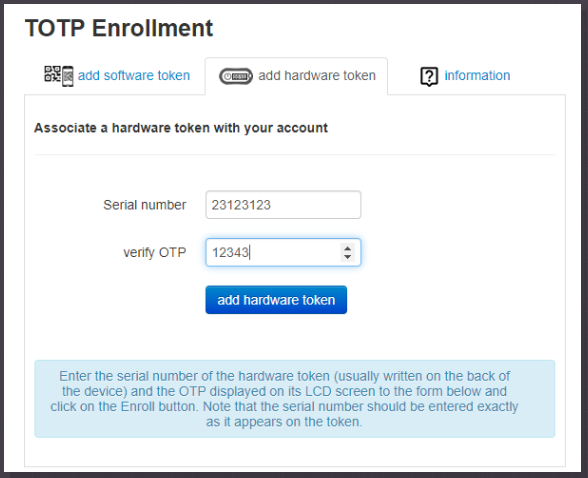
In addition to software token enrollment, the new portal also allows hardware token enrollment:

The enrollment process is described below:
- Your administrator has to import the hardware tokens to the database before you can use the token
- The serial number is laser engraved on the back of your token device. Enter the serial number exactly as it appears, without spaces or other non-numeric symbols
- Press the button on the token and enter the 6 digit code into the OTP field
- Important: only TOTP hardware tokens with 30 seconds offset and 6 digits OTP are supported
About
Installation and configuration
- Installation and initial configuration
- Network configuration
- Migrating from older versions
- LDAP Configuration
- Azure AD Configuration
- Self-service enrollment portal
- Web and LDAPS Certificates
- Syslog configuration
- Single-factor authentication exceptions
- Slave appliance mode
- Dynamic RADIUS Attributes
Integration guides
Blog
09-12-2025
Framework ExpansionCard Enclosure for Token2 Keys
 Framework laptops are all about modularity. The Framework ExpansionCard 3D-printable enclosure for Token2 PIN+ Type-C keys brings FIDO2 security directly into your device.
16-09-2025
Token2 PIN+ Keys Now Supported by MojeID at High Assurance Level
 MojeID, the Czech national digital identity service operated by CZ.NIC, has officially added Token2 PIN+ security keys to its list of devices accepted for the high assurance (úroveň záruky vysoká) level.
18-07-2025
Windows 11 Update KB5062553 Breaks FIDO2 Security Key Management
 A recent Windows 11 update — KB5062553 — appears to have introduced a critical issue affecting FIDO2 security key management. Update as of 12 September 2025 – This issue is resolved in Windows 11 24H2 (build 26100.6584, KB5065426).
